Computer Faults & How To Diagnose And Repair Your Computer – A Computer Technicians’ Perspective
Over the years computers have been becoming more and more advanced. We’ve seen over the last 15 years software like Microsoft office absolutely dominate the work place when it comes to getting things done. Work places and consumers are becoming even more reliant on computers to be absolutely 100% functional to get through day to day tasks keeping us productive at work or at home. However, what happens when the computer you rely on for your day to day work activities fails? Most people would not have a clue how to perform advanced problem solving steps to combat these common computer issues.
Computer Fixperts – A computer repairs Brisbane local business, have decided to compile a bit of a guide for you to follow when it comes to diagnosing and repairing your common computer repairs faults. Keep in mind that if you’re not feeling up to the task of repairing your computer, you can contact Computer Fixperts for all laptop repairs Brisbane wide.
Some of the problems that you face every day on your computer can easily be fixed if you can adequately diagnose them. Computer problems can be hardware of software-related. Through a well-executed diagnostic procedure, you will be able to pinpoint the exact problem that is impairing your computer’s functionality. After you’ve plainly defined the problem, you can them work your way to finding the perfect remedy. Throughout this post, you will see our recommendations for the best computer diagnostic software available to help you fix your computer problems.
Step 1: POST
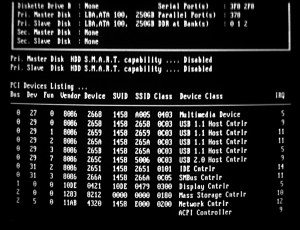
One of the first steps for fixing computer hardware faults is by starting with the POST. The Power ON Self-Test (POST) is generally what your computer goes through when you turn it on before the operating system loads. This computer test will be useful in displaying hardware problems that won’t boot. By observing this test, you may also discover problems that limit the operation potential of your computer even if it boots normally.
There are a few principal duties of the #BIOS during a POST such as:
• verifying the BIOS code itself and the integrity of the BIOS.
• Checking the registers of the CPU
• Finding and verifying the main memory of the system itself
• BIOS initialization
• Catalog, discover & initialize system devices and buses
• Just to name a few…
In order for a computer to successfully boot, its BIOS, operating system and hardware components must all be working properly; failure of any one of these three elements will likely result in a failed boot sequence.
When the computer’s power is first turned on, the CPU initializes itself, which is triggered by a series of clock ticks generated by the system clock. Part of the CPU’s initialization is to look to the system’s ROM BIOS for its first instruction in the startup program. The ROM BIOS stores the first instruction, which is the instruction to run the power-on self test (POST), in a predetermined memory address. POST begins by checking the BIOS chip and then tests CMOS RAM. If the POST does not detect a battery failure, it then continues to initialize the CPU, checking the inventoried hardware devices (such as the video card), secondary storage devices, such as hard drives and floppy drives, ports and other hardware devices, such as the keyboard and mouse, to ensure they are functioning properly.
The BIOS typically looks to the CMOS chip to tell it where to find the OS, and in most PCs, the OS loads #from the C drive on the hard drive even though the BIOS has the capability to load the OS from a floppy disk, CD or ZIP drive. The order of drives that the CMOS looks to in order to locate the OS is called the boot sequence, which can be changed by altering the CMOS setup. Looking to the appropriate boot drive, the BIOS will first encounter the boot record, which tells it where to find the beginning of the OS and the subsequent program file that will initialize the OS.
Once the OS initializes, the BIOS copies its files into memory and the OS basically takes over control of the boot process. Now in control, the OS performs another inventory of the system’s memory and memory availability (which the BIOS already checked) and loads the device drivers that it needs to control the peripheral devices, such as a printer, scanner, optical drive, mouse and keyboard. This is the final stage in the boot process, after which the user can access the system’s applications to perform tasks.
From wacky alarm clocks to lecture hall tools and after class entertainment, these Android apps are a good fit for a student’s life and budget. Read More »
Step 2: SMART
Your computer has a built in Self-Monitoring, Analysis and Reporting Technology that let the hard drive monitor itself and give you forewarning in case it begins to experience problems. Though not always dead-on accurate, this feature is often useful for diagnosing hard drives that are failing before they fail completely. Typically, a SMART error message is an indication of impending hard drive failure.

Step 3: OS Load Time Test
If your computer takes an unusually long time to load the operating system, you have probable reason to assume that there are errors in the hard drive. The most common causes of slow OS loading are hard drive seek errors. Other hard drive errors may also cause your computer’s operating system to load slowly. If you’re just overall looking to improve the Operating System load time, you could consider installing a Solid State Hard Drive in to your computer. Typically the read/write speeds of SSD drives are 5 times faster than traditional mechanical hard drives. Take a look at this article below outlining the difference between standard hard drives and Solid State drives.
Until recently, PC buyers had very little choice for what kind of file storage they got with their laptop, ultrabook, or desktop. If you bought an ultrabook or ultraportable, you likely had a solid-state drive (SSD) as the primary drive (C: on Windows, Macintosh HD on a Mac). Every other desktop or laptop form factor had a hard disk drive (HDD). Now, you can configure your system with either an HDD, SSD, or in some cases both. But how do you choose? We explain the differences between SSDs and HDDs, and walk you through the advantages and disadvantage of both to help you come to your decision.
HDD and SSD Explained The traditional spinning hard drive (HDD) is the basic nonvolatile storage on a computer. That is, it doesn’t “go away” like the data on the system memory when you turn the system off. Hard drives are essentially metal platters with a magnetic coating. That coating stores your data, whether that data consists of weather reports from the last century, a high-definition copy of the Star Wars trilogy, or your digital music collection. A read/write head on an arm accesses the data while the platters are spinning in a hard drive enclosure.
An SSD does much the same job functionally (saving your data while the system is off, booting your system, etc.) as an HDD, but instead of a magnetic coating on top of platters, the data is stored on interconnected flash memory chips that retain the data even when there’s no power present. The chips can either be permanently installed on the system’s motherboard (like on some small laptops and ultrabooks), on a PCI/PCIe card (in some high-end workstations), or in a box that’s sized, shaped, and wired to slot in for a laptop or desktop’s hard drive (common on everything else). These flash memory chips differ from the flash memory in USB thumb drives in the type and speed of the memory. That’s the subject of a totally separate technical treatise, but suffice it to say that the flash memory in SSDs is faster and more reliable than the flash memory in USB thumb drives. SSDs are consequently more expensive than USB thumb drives for the same capacities.
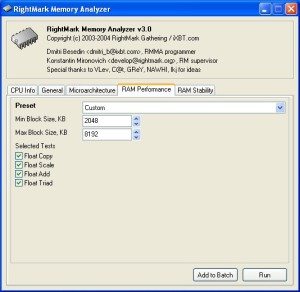
Step 4: RAM Test
RAM – Random Access Memory – Failing RAM has been found to be the cause of many computer problems. Most computer RAM problems involve the computer sending some kind of particular data to the RAM, but the malfunctioning RAM send back inappropriate data. This can cause some computer applications to crash. It may even result in file corruption and the Blue Screen of Death. Windows-based operating systems have built-in memory diagnostic tools that test you RAM and try to detect errors. When coming across a potential RAM issue, sometimes a perfect remedy can be to simply just re-seat the RAM modules in their respective slots. Perhaps even swapping them around or only using one of them RAM sticks.
Step 5: Graphics Test & Laptop Screens
It’s important to evaluate the performance of your computer graphics as this might be an indicator to various problems hardware or otherwise. In case you find that your computer has reduced graphics, suspect that there might be driver failures or other hard drive problems especially those affecting the graphics card. Benchmark utility tools such as 3DMark are excellent stress testers for your graphics card. If your graphics card is faulty, overheating or failing, a stress tester will cause graphical issues, blue screens, and system crashes. Sometimes graphics issues can be caused by over heating either from poor ventilation or overclocking your graphics card.
Sometimes what looks initially like a graphics issue, could in face be a broken laptop screen. If you’re in need of laptop screen repairs in Brisbane check out our article on how to repair a laptop screen!
Step 6: Audio Tests
Though rather unorthodox, testing the audio functions of your computer can offer useful info on the operational status of the computer. Play an audio clip of appropriate length on the computer and listen carefully to how it plays. The sound should be smooth. Therefore, if you realize that it’s slow and/or choppy, your computer’s processor is compromised. Choppy sound may also be associated with a processor that is overworking or a computer that lacks enough RAM for all the programs it is running. This Audio test can be confirmed further by altering the startup sound. Choppy sounds are frequently associated with Programmed Input/Output- PIO mode. Switching to DMA will change how your computer’s hard drive reads and writes data. This may repair choppy sounds by increasing read and write speeds of the hard drive.
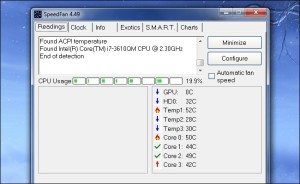
Step 7: Heat Levels Test
Knowing how hot your computer is can be an excellent pointer to problems with the computer’s hardware and software components. A computer that overheats is prone to system crashes, random unauthorized shutdown, and even bluescreens. Computers monitor their temperatures and provide this information in the computer’s BIOS. Viewing this information, however, requires third-party utilities such as SPeedFan. You then can check the manufacturer’s recommended temperature levels for your computer so that you can adjust the levels to an appropriate range. Remember a computer could be overheating simply because it is placed in a hot place, is poorly ventilated, full of dust or has a faulty fan.
Step 8: CPU Test
Your computer may be malfunctioning because of a program that is consuming more resources than your CPU can offer. Using the computer’s Task Manager, you can view the percentage of CPU and RAM that every process on the computer is consuming. Using a utility like Prime95, you can test the performance of the CPU and even make adjustments such as overclocking. Such utilities are CPU stresses that push your system to work to its optimum. This offers you an excellent means to assess and adjust the CPU settings so that your computer is always stable after every load.
Step 9: New Installations Test
Sometimes when a new hardware or software is installed, the computer’s operating system may conflict with this new installation. New hardware may, for instance, cause driver-OS conflicts such as when drivers are badly written. If Windows does not notify you about faulty devices, you can look at the computer’s Device Manager to locate and adjust incorrect hardware properties. If you notice that your computer experiences a problem every time a particular program starts, you should consider uninstalling the program. Some software may load automatically at Startup and cause untold computer problems. Using Windows Task Manager, you can enable or disable startup applications.
Step 10: Listening Test
Computer problems, especially those that involve the hard drive, precipitate unusual noises when the computer is running. If you listen carefully and hear clicking, scratching or even loud noises from the computer’s hard drive, it is advisable to shut down immediately and have a computer technician assess the situation. Such sounds indicate hard drive failure. The sound made by the fan can also tell if the computer’s processor is in bad shape. Normally, the fan should come to high speeds only when the computer is working really hard. If even at rest the fan is laboring, the CPU may having issues.
Step 11: Virus Scans
Before we get into it, why not check out our post here comparing the best antivirus programs available. Computer malware has been known to impair a computer’s performance. The problems in your computer could be manifestations of malware or virus infections. Using an up-to-date computer antivirus, you can easily unearth malware activity that has been affecting your computer.
Simplified Diagnosis for Computer Hardware Problems
To check what components of your computer are causing problems, you can match the symptoms outlined below to the recommended diagnosis protocol to try and locate the source of your computer’s woes.
If you turn on your computer and it:
• Does nothing, makes no sound with no lights showing, check the power supply, motherboard, and CPU
• Just beeps, check the keyboard, video card, RAM, motherboard and also refer to the relevant beep codes
• Sounds normal but the screen shows nothing, check whether the monitor is powered. Check also the video card and its connection to the computer
• Freezes before the OS loads, check the keyboard, video card, RAM, power supply, motherboard and CPU
• Freezes when the OS begins to load, try booting in safe mode (press and hold F8) since this is most probable a software problem
If after startup your computer:
• Makes a screeching sound, or other unnatural noises, check the power supply, CPU, computer case, internal fans, CD-ROM, hard drive or any other external drives connected to the computer.
• Shuts down suddenly, check power features in the BIOS and Control Panel. Check also the power supply, internal fan, and dust accumulation.
Some hardware problems are incredibly difficult to diagnose. Sometimes the finest option is to swap out the suspected culprit and see if the problem is rectified. This is a trial and error approach where you may have to swap out one component after another till you get to the affected hardware. Since this is not always a cheap endeavor, it is advisable that you first troubleshoot and diagnose your system extensively. This gives a well-founded guess of what component may be faulty. Professional consultation is a prudent undertaking when buying new components so that you get hardware that is compatible with your system.
Simplified Diagnosis for Computer Software Problems
Software problems are much easier to deal with than hardware-related complications. They mostly are linked to software incompatibility with the computer operating system. Software problems will manifest only when the affected software is running. This may include freezing or system crashes. If a startup program is causing problems for your computer, this will be manifested the moment the OS loads. The best remedy for software problems is uninstalling the faulty programs.
You can easily diagnose software issue by pressing and holding F8 when the computer is starting. This allows you to log into the computer in safe mode. If the problem still manifests in safe mode, it is possible that the computer’s OS has a problem.
Conclusion
Some computer problems are intricate and difficult to diagnose unless you are a laptop repairs Brisbane technician specialising in many different types of computer services. If the computer with a problem is a new PC still under warranty, you do not have to tire yourself. Take it to the dealer’s shop and have the manufacturer fix it for you free of charge. Nevertheless, if the warranty on the computer has expired, a reputable computer expert is your most preferred option. He or she will fix the problem in a way that it will not recur in future.
If you’ve found this blog post to be helpful in your search for diagnosing your computer issues. Please read more at our blog here. You can also add us on Facebook, Twitter & Google+